Over the past three weeks I’ve been completely overhauling my home server setup, and I’ve learned a lot throughout the process that I thought I’d document it here in a build log.
For context, I’ve had my current home-server since 2015. It’s a low-powered i3-4160 running 32GB of ECC memory, with 27TB of usable storage spread across a hodge-podge of 3TB, 4TB, and 8TB drives all jammed into a cheap Rosewill 4U chassis. Until 2020 it was running FreeNAS, but like many others I made the switch over to Unraid and never looked back.
Unraid was great for me, as its seamless Docker integration allowed me to add significant functionality to what was basically just a file server with Plex. With Unraid I was able to start self-hosting a lot of additional services, like Bookstack for keeping notes organized, a Unifi controller to manage my wifi access points, Teedy to organize my important documents, a few containers for archiving podcasts and Youtube channels, etc.
With this growth in functionality, however, my poor little i3 was struggling to keep up. I had bought it initially because it was cheap and supported ECC memory, a feature you otherwise have to go Xeon to get. And so for a while now I’ve been looking to upgrade.
Between some unexpected income, some timely sales, and some other PC upgrades I’ve done around the house, the time to upgrade has finally arrived. It certainly wasn’t cheap, but by shuffling around some components between my existing systems, I was able to not only build a significantly upgraded home server, but squeeze out an offsite backup as well! Here’s how it came together.
The Specs
- CPU: Ryzen 3600. This was pulled straight from my gaming PC, which I just upgraded to a 5900x. It gives me 6 hyperthreaded cores (e.g. 12 threads) of computational goodness. It’s not the fastest chip out there, but it’s certainly more than enough for a home server, supports ECC memory (more on this later), and doesn’t suck back a tonne of power.
- Cooler: Noctua NH-U12S. Can’t go wrong with Noctua, and at this point we’re a Noctua household. I probably could have gotten away with the stock cooler, but given that this system will run 24/7/365 I wanted to keep the CPU as frosty as possible.
- Motherboard: Asus B550-F. Solid board with exceptional power delivery. Bonus is that it has 2.5Gb ethernet built right in, which goes well with the 2.5Gb switch I just picked up. This puts my whole home network at speeds fast enough to saturate the drives without having to fork over big money for 10Gb.
- Memory: Timetec 2x16GB ECC. A bit slow and boring without any RGB, but this is a server dammit!
- Power Supply: Seasonic Focus GX-650W 80+ Gold. Like the motherboard, this gives great power delivery and comes with a 10 year warranty.
- Case: Fractal Define 7 XL. An absolute chonker of a unit with the ability to store 18 hard drives. Clean aesthetic as well with sound dampening to keep things quiet. I made sure to buy lots of extra hard drive sleds so that I can keep adding drives long after Fractal drops support for it.
- Host Bus Adapter: LSI 9210-8i (used off Ebay). The motherboard I bought only has 6 SATA ports, so this essentially allows me to add 8 extra hard drives using a couple of SAS to SATA breakout cables
- GPU: HP Quadro P400 (used off Ebay, still waiting for it to arrive). At the time of ordering, I wasn’t sure if the motherboard I got supported headless boot. Coming in at around $120 and paired with a dummy plug, this rather inexpensive GPU solves that problem and while also helping significantly with Plex transcoding, all without drawing much extra power.
- Hard Drives: 3x8TB Seagate Ironwolfs as well as 3x8TB WD Reds I had from the old server. Nothing special here, just some standard CMR NAS drives.
- Cache Drives: 2x1TB Samsung 860 Evo SSDs. I actually got these a couple years ago, but these are relatively affordable and have decent write endurance at 600TBW, so they’ll do just fine as a cache for Unraid.
- Blu-Ray Drive: LG WH16NS40. This actually came from my desktop PC, as the new case I got for it didn’t support an optical drive. I’ll be feeding it into a Windows VM so that I can archive data using BD-R HTL discs (which contrary to popular opinion are great for archival purposes due to their use of inorganic dyes)
Using Unraid this gives me 32TB of usable storage, with the ability to lose two drives from the pool without losing any data. I also shucked an old external 10TB drive and bought a 12TB Toshiba Enterpise drive to add to all the 3TB and 4TB drives on my old server. This left me with 29TB of usable offsite storage, with the 12TB drive being used for parity. I went with a slightly larger 12TB drive as the parity so that when all those 6-year-old 3TB drives start drppping like flies I can replace several of them with a single drive and cut down the overall amount of rust I have spinning at once.
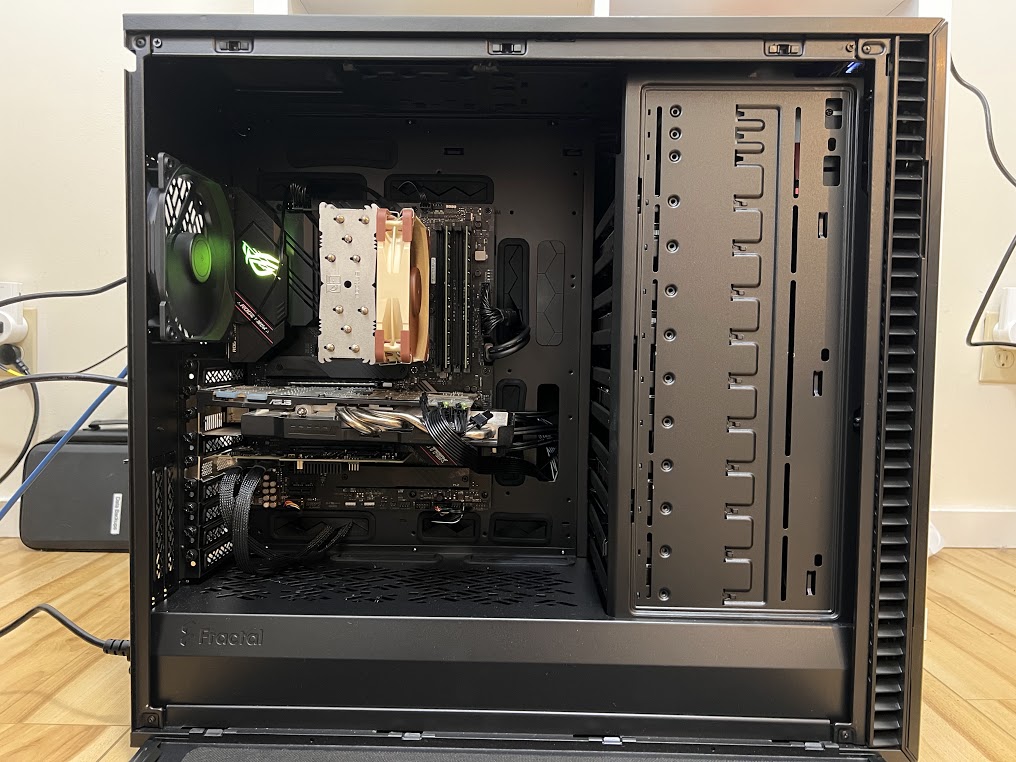 (I’ve got an old Nvidia 660ti in there right now while I wait for the P400 to arrive)
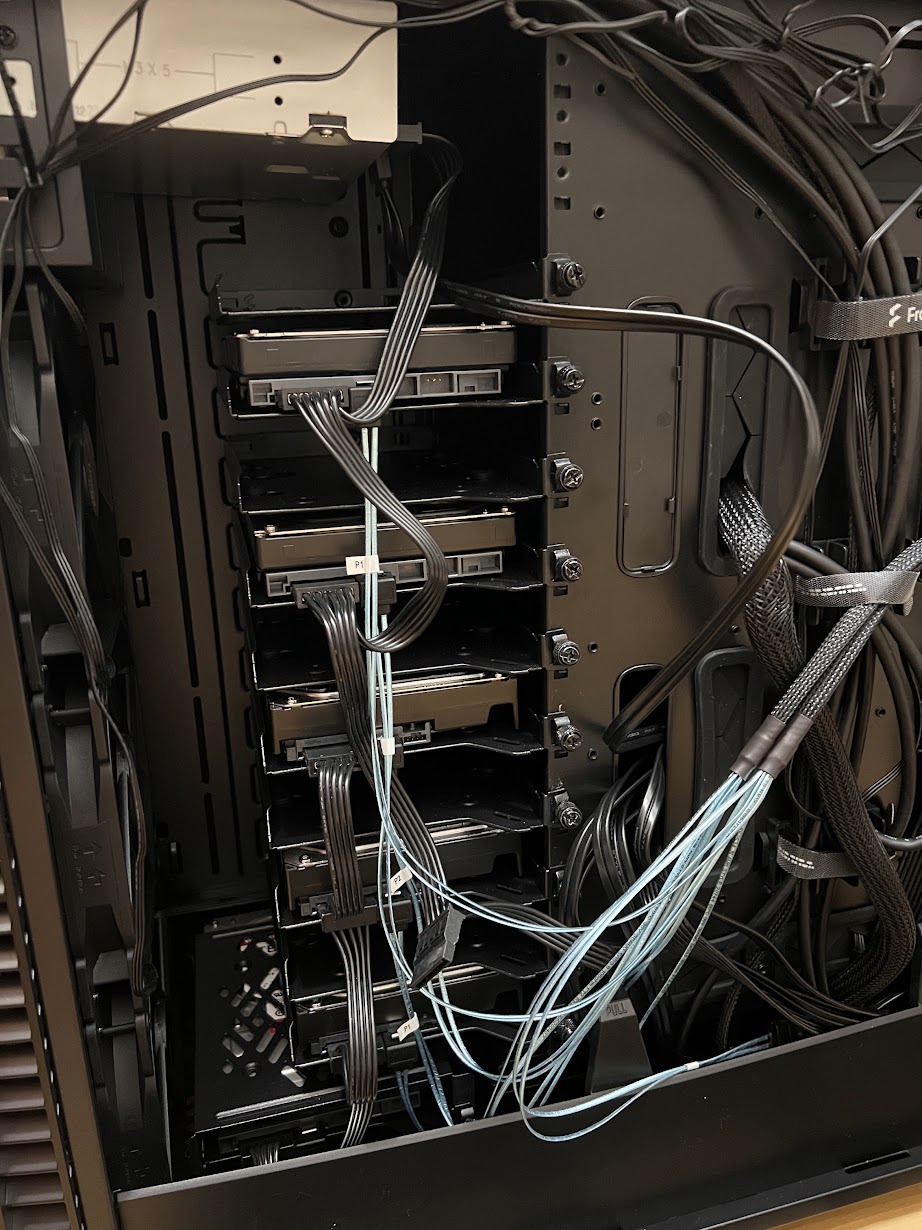 (Excuse the horrendous cable management, but it seems wrong to include photos without showing the hard drives.)
The Problems
1. ECC Memory: I usually love building PCs, but this one was straight up stressful. Let’s start with the memory. Ryzen desktop CPUs are wonderful because they support ECC memory, whereas Intel likes to lock that feature down to their more costly Xeon line. Great, right? Well, it’s not that simple. While ECC is technically supported by the chip, the implementation on the motherboard supply is… inconsistent. There’s lots of mixed information out there about whether particular motherboards actually support ECC with Ryzen, and that’s muddied even more by the fact that many motherboards have the ECC silently correcting errors without reporting them to the operating system. This isn’t great, since your RAM may be failing and correcting lots of errors, but you’d never know. In short, ECC seems great on Ryzen, but in practice is an absolute shitshow.
So after banging my head against the keyboard, I finally decided to just plunk the ECC memory that had already arrived into my partner’s new Asus B550-f motherboard. Unfortuantely, she was running a 5700G which does not support ECC, but the motherboard BIOS nevertheless had an option for enabling ECC. So I took a leap of faith and ordered the same board from Amazon, knowing I could return it if I had to. Once it arrived, I booted up memtest and literally started dancing when I saw that it reported ECC polling enabled!
2. LSI & Ironwolf: So I built the server, spent a day getting 18TB of data transferred over, and was in the process of moving a few hard drives from the old server to the new one. This involved recalculating parity a couple of times as I added the drives, which is always a bit nerve-racking. Already anxious, my stomach then dropped like a rock when Unraid gave me an error message saying that one of my drives had reported read-errors and had been taken offline. Shit. If one more drive goes down I have to restart and move 18TB of data all over again. So I frantically start Googling and discover that as of the most recent version of Unraid, LSI controllers had started to have problems with 8TB and 10TB Ironwolf drives causing them to drop out of the array randomly. Fortunately, some users over on the Unraid forum had figured out a fix involving disabling low current spinup and EPC on the drive firmware itself. This turned out to be only about 20 minutes of work, but I certainly could have done without the stress that caused.
The Backup Strategy
With those issues out of the way, I was ready to start figuring out how exactly I was going to do my backups. Up until very recently, I had used Duplicati to back up my data to Backblaze B2, but there are two caveats here. The first is that at some point during the summer my Duplicati backup had corrupted and was rendered useless. My experience with Duplicati hadn’t been great so far, but losing 1.5TB of backups made me start looking elsewhere. The second issue is that I had only backed up 1.5TB of data, when I had around 18TB overall. At $5 per terabyte per month, B2 certainly isn’t expensive, but paying $90USD per month for backups was simply not an option for me. And so I had made the decision to only back up my critical data, such as photos and documents. This left a tonne of Bluray rips, GoPro footage, and other large datasets I’ve archived like various Youtube channels and Flashpoint at risk of being lost entirely should something happen to my server, such as theft or fire. I often told myself that most of this data was replaceable; I could always redownload Flashpoint, for instance. But the reality is that it would take me years to accumulate the same collection.
This is why I was so eager to get that offsite backup server. It would allow me to finally back up all of my data on a nightly basis. Unfortunately, my plan was to leave it at a relatives house, but that relative only has 1TB of bandwidth a month. While I doubt my nightly backups would exceed that limit, there have been a few months here and there where I’ve added 1-2TB of data to my hoard. And so while I now had offsite storage available, I didn’t have a good way of getting data onto it. I thought about physically moving the server back and forth once in a while to update it, but knew that there was no way I’d actually follow through on that and could leave myself open to losing several months of data. So instead, I developed a three-prong strategy.
The Big(ish) Data: For all of those extra-large datasets that might exceed that 1TB bandwidth cap, I’ll use an external SSD to move data over whenever I visit. Fortunately, I go there about twice a month so it should stay fairly up to date. To make this easier, I developed a Python tool called Waterlock (Github) that takes care of all the hard work involved. I wrote about it just recently, but essentially when it’s run on the source system it will fill up the external drive with as much data as it can, and when it’s rerun on the destination it will move all that over, keeping a record of everything that’s been transferred. It also uses checksums to verify file copies, and I’m in the process of adding versioning and a few other handy features as well. This allows me to easily and incrementally move all that data without touching their bandwidth cap whatsoever.
The Smaller Data: With the extra-large datasets taken care of, I decided to use rsnapshot for nightly backups of everything else. I had initially considered rsync, but if my home-server were to be hit by ransomware this would end up just syncing the damage over. rsnapshot, on the other hand, gives me some versioning that sovles this issue. In this case, I’ll be doing nightly versions that are held onto for 7 days, and then weekly versions afterwards that are held onto for a month.
The Failsafe: Just to be safe, I’m also using Duplicacy (not Duplicati, whose name is annoyingly similar) to back up all of that core data to B2 every night as well, with versions gradually being pruned over the course of about 6 months. Again, this is about 1.5TB of data, so only $7.50 a month to store on B2. So far Duplicacy has been rock solid and exponentially faster than Duplicati; hopefully it is more stable and less prone to corruption as well. It is paid software, but personal licenses are dirt cheap for what you get, which by the way includes deduplication, versioning, and client-side encryption. So far I’m loving it and have even bought extra licenses so that I can do more frequent backups of the computers in my house to the home-server as well. As for why I don’t use Duplicacy for backing up to the offsite server, well I want to keep at least one backup as standard, native files rather than cut into chunks, compressed, encrypted, etc. Suffice to say that corupted Duplicati backup has put the fear of god into me.
The Management Solution
Finally, I needed some way to manage the offsite server. I’m fairly adamant about using full-disk encryption, but that means that when the server reboots I need to enter a passphrase to start it back up properly, which I can’t easily do without being on-site. I am using Wireguard to connect the on-site and off-site servers together for the rsnapshot job to run and had considered extending this to my desktop so that I could access Unraid’s management interface, but couldn’t figure out how to configure it to run exactly how I wanted without opening ports on their end. Moreover, if the server reset and I didn’t notice, it would mean backups might not run properly. So as a compromise I decided to use SpaceInvaderOne’s tutorial for automatically fetching a keyfile when Unraid boots, only saving it to memory, and using that to unlock the encrypted disks. The upside here is that it allows the server to fully reboot on its own, and if it ever gets stolen I can just take down that keyfile. However, whereas SpaceInvaderOne uses an SFTP server to host the key, I decided to leverage that existing Wireguard connection so that I can keep the keyfile securely on my home-server and just rsync it over via the VPN connection.
Great, the server now boots up on its own, but I still want some way to access the management interface without driving over there. For this I am using Tailscale. Tailscale is a really incredible tool insofar as it’s dead simple to use. After installing the program, you just need to log in to your Google or Github account. Repeat this for each of your devices, and one by one they begin to form a mesh network powered by Wireguard. I was shocked at just how simple and effective it was, and it even has an iOS app, allowing me to even manage all my systems while I’m on the go. Best of all, it uses relay servers so that you don’t have to forward any ports. I couldn’t be happier with it.
So after weeks of planning, smashing my face into my keyboard, drives randomly dropping out of the array, cut fingers from the heatsink fins slicing through my flesh, and endless data transfer and parity calculations, I’ve finally got a home server I can really take full advantage of (or at least I will once this P400 arrives). And with that, it’s time to pack up that old Rosewill chassis and officially retire it to the offsite-backup location.